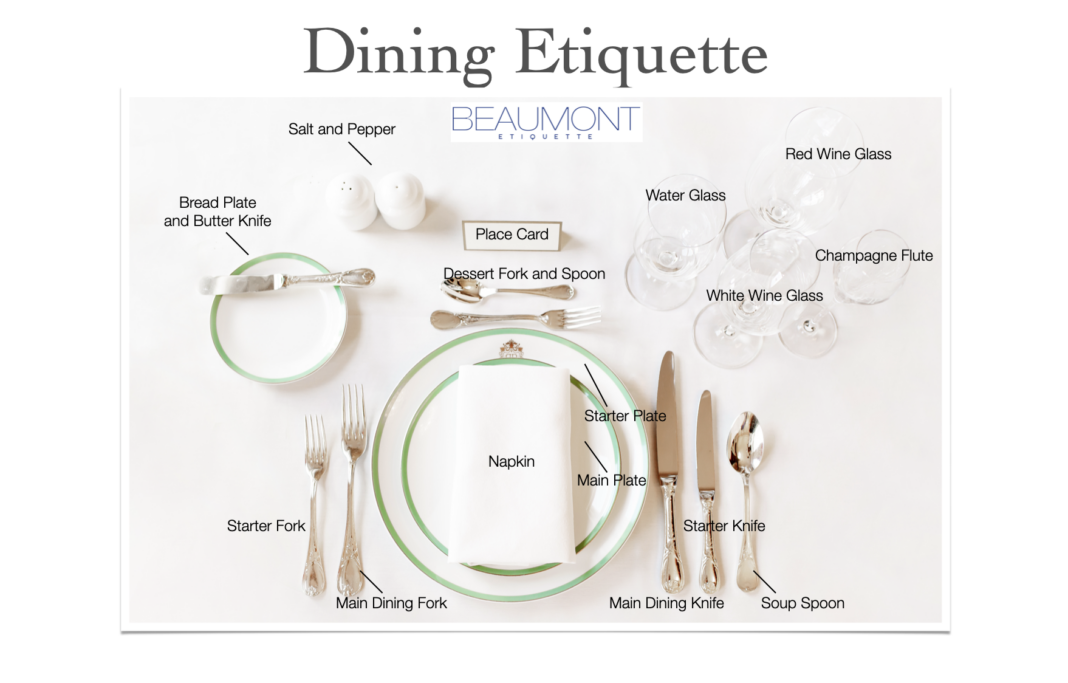
Setting a table is an art that demonstrates attention to detail and respect for your guests. Whether you’re hosting a formal dinner party or a holiday celebration, the correct table arrangement sets the tone for an elegant and seamless dining experience. Here’s a comprehensive guide to creating the perfect formal table setting.
Follow these step-by-step tips, or if you want to see it in action, click here to watch our video and explore a visual guide to creating the perfect table setting, complete with cheat sheets and pro tips!
Step-by-Step
- Center Plate Arrangement.
- Service Plate: In American dining, a service plate (also called a charger) is placed in the center at each setting. It serves as both a decoration and a heat/condensation shield for the table. The charger remains in place until the main course is finished.
- Main Dining Plate: Place the main dining plate in the center of each setting, on top of a service plate.
- Napkin: Fold the napkin neatly and place it atop the main dining plate. For an American table setting, consider adding a napkin ring for an extra decorative touch. Once out of use, the ring gets placed wherever it is out of the way.
- Dinnerware Arrangement:
- Glassware: Place the glassware to the upper right hand side of the setting. Remember, only place the glassware that you are going to use throughout the meal. Remember the water glass goes over the main dining knife.
- Bread Plate: Position the bread plate above the forks, to the upper left of the plate. Remember, bread is not considered a course but an accompaniment.
Pro Tip: Car lovers will find this super helpful. Remember table setting order with the ‘BMW’ mnemonic: Bread on the Left, Meal in the Middle, and Water/Wine on the Right.
Flatware / Silverware Placement:
- Arrangement: Arrange flatware in the order it will be used, working from the outside in.
- Left Side: Salad fork (outside) and dinner fork (inside).
- Right Side: Dinner knife (closest to the plate with the blade facing inward), followed by the fish knife or soup spoon (if applicable).
- Above: If dessert is being served, the flatware can be placed horizontally above the charger plate.
- Butter Knife: Place a butter knife either horizontally or vertically, the choice is up to you, with the blade facing down.
Pro Tip: Remember cutlery placement with this easy trick: Forks (4 letters) go on the Left (4 letters), while Knife (5 letters) and Spoon (5 letters) belong on the Right (5 letters). To determine the order of Knife and Spoon, simply remember the alphabetical order: Knife (K) comes before Spoon (S), so the Knife is placed closest to the plate.
- Glassware Placement:
- Water glass: is placed directly above the dinner knife.
- White wine glass: Sits slightly to the right and below the water glass.
- Red wine glass: Positioned above the white wine glass.
- Champagne Flute: Placement depends on when the toast occurs. For a toast at the start of the meal, place it to the side of the setting, as it’s the first item you’ll use. For a toast at the end, place towards the back of the glasses behind the water glass. Try Myka Meier’s way of remembering this by saying “the flute floats” depending the toast!
- Name Cards:
- Who Gets a Name Card: All guests at a formal dinner should receive a name card to indicate their seating, except the Host.
- Placement: Place the name card above the charger or dessert cutlery, centered between the bread plate and glasses.
Pro Tips for Formal Table Setting
- Bread Plate and Butter Knife: The bread plate is not considered a course but should always include a small butter knife, placed horizontally across the top of the plate with the blade facing down.
- Knife and Fork Etiquette: After each course, rest your knife and fork diagonally across the plate to indicate you’re finished.
- Spacing: Ensure symmetry by aligning all plates, utensils, and glasses evenly. Place utensils one inch from the edge of the table to make the setting most comfortable for the guests.
Key Points to Remember
- -Only set the items that you will be using for a meal
- -Glassware follows the “right to left” rule of usage, starting with water and progressing through white wine, red wine, and champagne.
- -Name cards are a thoughtful touch that avoids confusion and ensures every guest feels welcome.
- -Bread is served with the meal but is not its own course.


